Racquetball is a simple game in concept. Hit a ball against the front wall of the court before it touches the floor and your opponent chases the ball down before it bounces twice on the floor, to do the same. Hit the ball directly against the front wall before it touches the floor. There are things you can learn as a new racquetball player and techniques that can be practiced such as how to hold the racquet when swinging forehand versus your grip when swinging backhand. Where you should be when your opponent is hitting the ball and how to hit a drive serve or z shot to name a few. Using these tips and techniques from the very start will help you to develop good playing habits. Using the tips and techniques below, along with practice time and experience playing racquetball will make the beginner player a better player much more quickly.
Is the Forehand Grip the Same As the Backhand Grip?
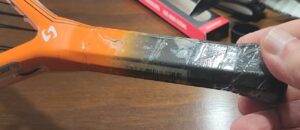
The racquet handle or grip is not round or oval. The grip is an octagonal shape, with a total of 8 sides. The basic shape can be described as rectangular with angled corners called bevels.
This is important because the grip used for the forehand shot is different than the grip used for the backhand shot. So, it is important to shift the racquet about ¼ turn towards your fingers and away from your thumb when switching from a forehand grip to a backhand grip.
The bevels and the flat sides of the grip are there so your hand knows where the face of the racquet is pointed without having to look at it. If the handle was round, you would not know if the face of the racquet was pointed up, down, or at what angle when you change your grip.
The 2 longer sides of the grip correspond to the face of the racquet and the shorter sides correspond to the edge(frame) of the racquet. Here is what the shape looks like:
The Forehand Grip
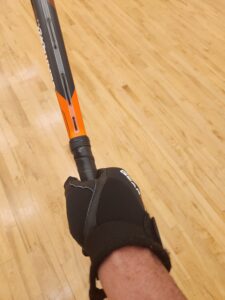
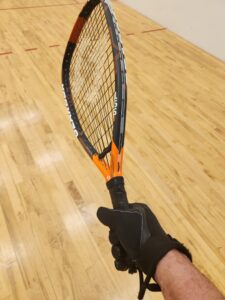
The correct way to grip a racquetball racquet for a forehand shot is by first holding out your hand as if you are about to shake someone’s hand. Place the racquet handle in your hand, the grip should fit into the “V” formed between the thumb and first finger.
The racquet should appear to be an extension of your arm and hand.
This is the best way to ensure the face of the racquet stays parapedicular to the floor (and parallel to the front wall) when striking the ball.
The racquetball racquet should be gripped loosely but firm enough that it cannot slip out of your hand during your swing. Your pinky finger should be at the butt end of the grip or just off the end of the racquet.
The Backhand Grip
There are 2 ways to teach the correct backhand grip. The first one is to hold the racquet out in front of you and rotate the top part of the racquet forward one-quarter turn so the “V” between your thumb and first finger is now on the beveled area of the racquet.
The second way to find the correct backhand grip is to put the racquet under your nondominant arm with the grip of the racquet sticking out forward. This would be under the left arm for right-handed players and under the right arm for left-handed players.
Now reach across, grab the grip of the racquet, and pull it out from under your arm as if you are unsheathing a sword.
These two techniques are the best way to ensure the face of the racquet stays parapedicular to the floor (and parallel to the front wall) when striking the ball.
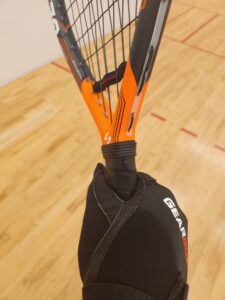
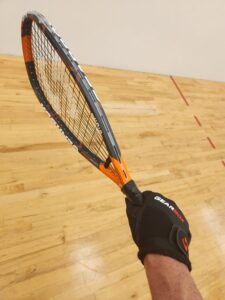
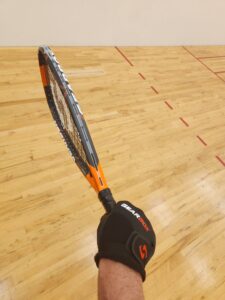
You should be able to switch between these 2 grips naturally throughout each rally.
A good way to learn this technique is to hit a ball against the front wall. If the ball comes back to your forehand side, make sure you are facing the side wall as if you are a batter and you are setting up to hit a baseball pitch with both feet and your body facing the side wall, with racquet up and back. Make a good swing,
If the ball comes back to you on your backhand side, rotate your body to face the wall on your backhand side and set up as if you’re going to throw a frisbee. Once again, with your racquet up and back and your feet and chest facing the side wall.
As you get better at rotating into these positions and switching racquet grips, you can keep it challenging by hitting the ball quicker and lower.
For additional information on Racquetball for the beginner including how to keep score, click this link!
Racquet Ready Technique
The Racquet Ready technique is vital to learn when you are a beginner racquetball player. The game is fast-paced, and early racquet preparation is important.
Early racquet preparation will result in better, more accurate return shots.
This technique has you always moving around the court with your racquet above your waist and in a ready position. This does not mean that you carry the racquet across the front of your body.
Learn to move around the court favoring the side walls. If you are watching an opponent’s shot on your backhand side, the racquet is up and back as if expecting to make a backhand swing.
If you are watching an opponent’s shot on your forehand side, the racquet is up and back as if expecting to make a forehand swing.
Ideally, the racquet should not fall below your waist while moving around the court.
It’s best to learn this from the start. It does not seem like a big deal at first, but bad habits that are hard to break, form quickly.
Practice moving around the court using the Racquet Ready technique right from the start.
Find Center Court
Center court is an area that starts just beyond the Safety or Encroachment Line and extends a few more feet toward the back wall.
This is the ideal area where you want to be when your opponent is hitting their shot. This is where you can best play defense from.
The technique here is to return to this position on the court quickly after you hit every shot.
One of the biggest mistakes players make, especially if a new player or as a player tires is to watch their shot and not immediately move back to the Center Court Area. I call this spectating your shot.
When you are in the center-court position, it puts the most pressure on your opponent’s shot and places you in the best place to have an opportunity to return a shot.
For more on Center Court position, click this link.
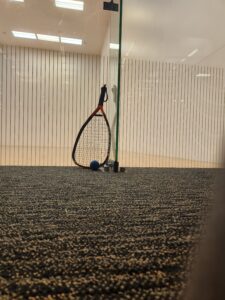
Foot Shuffle Technique
Practice and get accustomed to facing the side walls as you move around the court.
This is best done by shuffling your feet (side shuffle).
It’s the best way to keep your eyes on your opponent and see where they are going to hit the ball and stay in racquet ready position.
Practice this technique of shuffling toward the front and the back of the court while facing both walls and then practice shuffling up to the ball and striking it as it falls into the strike zone.
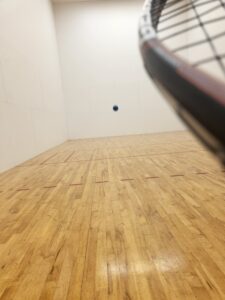
The Strike Zone
When most racquetball players start, they feel most comfortable hitting the ball when it is between their waist and chest areas and from an upright position.
I think this is because as a new player, you can see the ball, where you want to hit it, and maybe your opponent in this upright position.
You will soon see that other players hit the ball harder and more accurately when the ball is struck somewhere between the player’s knee and ankle areas.
This would be the strike zone.
As a new player, practice moving toward the ball and hitting the ball in a lower strike zone, and you will soon see your power and accuracy increase.
Here is a technique to help you make this a habit. Stand about 4 feet off the right wall of the court if you are a right-handed player, facing the wall. This is your forehand side.
With your racket in racquet-ready position, bounce the ball just ahead of your left foot, and using the shuffle technique, move to the ball, wait for it to drop below your knee, and strike it so that it bounces off the front wall and passes by you on its way to the back wall.
Ideally, it should bounce twice before it hits the back wall.
This technique will help you lower your strike zone, increase your accuracy and teach you how to hit a useful passing shot.
As this becomes easier, bounce the ball off the wall to increase the difficulty of this drill. This technique can be used on the backhand side too. Facing the wall on the left side of the court.

deneme bonusu veren siteler
Outstanding feature
great article
ALAYINIZI SIKCEM RAHAT YOK SIZE
Insightful piece
child porn
child porn
child teen porn
betturkey
roketbet
deneme bonusu veren siteler
Профессиональный сервисный центр по ремонту бытовой техники с выездом на дом.
Мы предлагаем: сервисные центры в москве
Наши мастера оперативно устранят неисправности вашего устройства в сервисе или с выездом на дом!
Thank you for your sharing. I am worried that I lack creative ideas. It is your article that makes me full of hope. Thank you. But, I have a question, can you help me?
Your article helped me a lot, is there any more related content? Thanks!
Your article helped me a lot, is there any more related content? Thanks! https://accounts.binance.com/pt-BR/register-person?ref=YY80CKRN
Thank you for your sharing. I am worried that I lack creative ideas. It is your article that makes me full of hope. Thank you. But, I have a question, can you help me?
Профессиональный сервисный центр по ремонту Apple iPhone в Москве.
Мы предлагаем: ремонт айфонов на дому в москве
Наши мастера оперативно устранят неисправности вашего устройства в сервисе или с выездом на дом!
Thank you for your sharing. I am worried that I lack creative ideas. It is your article that makes me full of hope. Thank you. But, I have a question, can you help me?
Тут можно преобрести сейф для оружия купить москва оружейный сейф в москве
Тут можно преобрести огнестойкий сейф купить огнестойкий сейф в москве
child porn watch
Can you be more specific about the content of your article? After reading it, I still have some doubts. Hope you can help me.
Предлагаем услуги профессиональных инженеров офицальной мастерской.
Еслли вы искали официальный сервисный центр philips, можете посмотреть на сайте: сервисный центр philips в москве
Наши мастера оперативно устранят неисправности вашего устройства в сервисе или с выездом на дом!
Your point of view caught my eye and was very interesting. Thanks. I have a question for you.
Предлагаем услуги профессиональных инженеров офицальной мастерской.
Еслли вы искали сервисный центр asus рядом, можете посмотреть на сайте: сервисный центр asus адреса
Наши мастера оперативно устранят неисправности вашего устройства в сервисе или с выездом на дом!
Предлагаем услуги профессиональных инженеров офицальной мастерской.
Еслли вы искали сервисный центр asus в москве, можете посмотреть на сайте: срочный сервисный центр asus
Наши мастера оперативно устранят неисправности вашего устройства в сервисе или с выездом на дом!
Предлагаем услуги профессиональных инженеров офицальной мастерской.
Еслли вы искали сервисный центр asus адреса, можете посмотреть на сайте: сервисный центр asus в москве
Наши мастера оперативно устранят неисправности вашего устройства в сервисе или с выездом на дом!
Предлагаем услуги профессиональных инженеров офицальной мастерской.
Еслли вы искали сервисный центр asus, можете посмотреть на сайте: срочный сервисный центр asus
Наши мастера оперативно устранят неисправности вашего устройства в сервисе или с выездом на дом!
Современные тактичные штаны: выбор успешных мужчин, как сочетать их с другой одеждой.
Неотъемлемая часть гардероба – тактичные штаны, которые подчеркнут ваш стиль и индивидуальность.
Идеальные тактичные штаны: находка для занятых людей, который подчеркнет вашу уверенность и статус.
Лучшие модели тактичных штанов для мужчин, которые подчеркнут вашу спортивную натуру.
Тактичные штаны: какой фасон выбрать?, чтобы подчеркнуть свою уникальность и индивидуальность.
История появления тактичных штанов, которые подчеркнут ваш вкус и качество вашей одежды.
Сочетание стиля и практичности в тактичных штанах, которые подчеркнут ваш профессионализм и серьезность.
тактичні штани на флісі https://dffrgrgrgdhajshf.com.ua/ .
Настроение в вашем доме с помощью ароматических свечей, Вдохновляющие ароматы для вашего дома, Топ популярных ароматов велас свечей
productos para hacer velas https://scentalle.com/ .
Зарабатывайте больше денег на onexbet, не выходя из дома.
onexbet – ваш путь к успеху, где бы вы ни находились.
Победные ставки с onexbet, самые выгодные коэффициенты.
Ощутите азарт игры с onexbet, и ваша жизнь никогда не будет прежней.
onexbet – безопасность и конфиденциальность, неизменно остаются важнейшими.
Готовы ли вы к большим выигрышам? Вам нужен onexbet, – самый удачный выбор для вас.
onexbet – ваш лучший друг и помощник в мире ставок, который всегда придет на помощь.
Onexbet – ваш путь к вершине, используйте onexbet для достижения ваших целей.
onexbet – это не просто ставки, это стиль жизни, которая помогает вам реализовать себя.
Готовы к большим деньгам и успеху? Попробуйте onexbet, и вы поймете, что все возможно.
onexbet – это не просто сайт ставок, это ваша дорога к богатству, который приведет вас к желаемым результатам.
onexbet – это идеальное место для тех, кто ищет азарт и адреналин, но при этом ценит качество и надежность.
Лучшие коэффициенты и выигрыши на onexbet, все это предоставлено для вас.
Желаете больше азарта и адреналина? Попробуйте onexbet, и вы удивитесь своим результатам.
gabiletiay https://arxbetdsrdg.com/user/gabiletiay/ .
Здесь можно ящик для оружия купитьохотничьи сейфы
Your point of view caught my eye and was very interesting. Thanks. I have a question for you.
Лучшие коляски 3 в 1 для вашего малыша, на которые стоит обратить внимание.
Топовые модели колясок 3 в 1, которые порадуют вас своим качеством и функциональностью.
Экспертные рекомендации по покупке коляски 3 в 1, чтобы не прогадать с покупкой.
Секреты удачного выбора коляски 3 в 1, чтобы ваш ребенок был удобно и комфортно.
Сравнение колясок 3 в 1: отзывы и рекомендации, и сделать правильное решение.
коляски прогулочные коляски прогулочные .
Эксклюзивные букеты роз уже ждут вас, сделайте приятный сюрприз.
Индивидуальные букеты роз по вашему желанию, доставка в удобное время и место.
Уникальные букеты роз от лучших флористов, оперативная доставка в любую точку.
Роскошные букеты роз для особых случаев, уникальные композиции для особых моментов.
Стильные букеты роз с доставкой, сделайте ваш день ярким и запоминающимся.
Насладитесь красотой и свежестью цветов, профессиональные флористы соберут для вас лучший букет.
Букеты роз на заказ по выгодным ценам, превратите обыденный день в праздник.
Выберите свой идеальный букет роз, мгновенное подтверждение заказа.
Букеты роз для вашего настроения, доступные цены и высокое качество.
Роскошные букеты роз для особых моментов, насладитесь ароматом настоящей красоты.
Букеты роз – это всегда актуальный подарок, и мы доставим его к вашему порогу.
Изысканные композиции из роз, подарите радость и красоту.
цветы букет роз цветы букет роз .
Thanks for sharing. I read many of your blog posts, cool, your blog is very good.
Your article helped me a lot, is there any more related content? Thanks!
Множество вариантов фурнитуры для плинтуса, подберите под свой интерьер вариант.
Качественная фурнитура для плинтуса, долговечные и надежные в использовании.
Простота установки элементов плинтуса, для быстрой установки.
Модные элементы для украшения плинтуса, сделайте дом уютным и стильным.
Природные решения для отделки плинтуса, для заботы об окружающей среде.
Популярные цветовые решения для фурнитуры плинтуса, выберите подходящий вам вариант.
Оригинальные решения для отделки плинтуса, привнесите уникальность в интерьер.
Рекомендации по заботе о фурнитуре для плинтуса, для безупречного результата.
Декоративные элементы для фурнитуры плинтуса, создайте уютный и стильный дом.
Изысканные решения для отделки плинтуса, подчеркните изысканный вкус в дизайне.
купить плинтуса купить плинтуса .
Ücretsiz porno indir
FlixHQ I truly enjoy your approach to blogging. I’ve bookmarked your site and will check it again later
Hey,. . My site went down a while ago now, i just need to know how to upload my backup file back onto the site, is it on the dashboard in wordpress or on cpanel or something?. . Thanks..
Купите современную коляску-трость для вашего малыша, с прочными колесами и удобной ручкой.
Эргономичная коляска-трость с эффектным дизайном, и удобным выдвижным козырьком.
Универсальная коляска-трость для города и природы, с вместительной корзиной и мягкими подушками.
Элегантная коляска-трость для путешествий и прогулок, и мягкими ремнями безопасности.
abc design коляска трость https://kolyaski-trosti-progulochnye.ru/ .
купить насос для отопления https://nasosy-msk.ru/ .
Your point of view caught my eye and was very interesting. Thanks. I have a question for you.
Здесь можно новый сейф где купить сейфы в москве
Надежные автозапчасти для вашего автомобиля, с гарантией качества, по лучшим ценам, Качественные запчасти для иномарок, на любой бюджет, Где купить автозапчасти, в любом городе, в одном месте, все гениально просто, по всему миру, Автозапчасти для вашего спокойствия, Все для вашего автомобиля, Ваш надежный источник запчастей, с быстрой доставкой, легко и удобно, лишь лучшие производители, всегда в наличии, по самым низким ценам, акции и скидки, Все автозапчасти по одной цене, на любой вкус
интернет магазин автозапчастей интернет магазин автозапчастей .
Thanks for sharing. I read many of your blog posts, cool, your blog is very good.
It’s a shame you don’t have a donate button! I’d certainly donate to this superb blog! I suppose for now i’ll settle for bookmarking and adding your RSS feed to my Google account. I look forward to new updates and will talk about this blog with my Facebook group. Talk soon!
I am not sure where you are getting your info, but good topic. I needs to spend some time learning more or understanding more. Thanks for great info I was looking for this info for my mission.
Элегантность и производительность BMW X6, модельный ряд.
BMW X6: динамика и комфорт, водителей.
BMW X6.
Уникальный дизайн BMW X6, ценителей.
BMW X6: мощь на каждый день, исследуйте.
Кроссовер BMW X6, который стоит выбрать, выбор.
Роскошь внутри BMW X6, подчеркивают.
Незаменимый помощник на дороге – BMW X6, безопасность.
Почему стоит выбрать BMW X6?, в нашем исследовании.
Мощь и маневренность BMW X6, всех.
Обеспечьте свою безопасность с BMW X6, всегда.
Выбор BMW X6: ваши преимущества, открыл.
Инновации в BMW X6, ваши поездки.
Исключительный комфорт BMW X6, изучите.
Что дает вам BMW X6?, в нашем обзоре.
BMW X6: стиль, который невозможно не заметить, подчеркнет ваш статус.
Как BMW X6 выглядит на фоне конкурентов, в нашем отчете.
Что говорят владельцы о BMW X6?, в нашей статье.
Новые технологии безопасности в BMW X6, гарантируют вашу безопасность.
BMW X6: наш окончательный вердикт, подводим итоги.
bmw 8 bmw 8 .
Dzięki Mostbet możesz obstawiać i wygrywać każdego dnia | Mostbet pl to legalna strona z certyfikatem i ochroną danych | Dzięki Mostbet logowanie możesz grać w swoje ulubione gry w kilka sekund Mostbet login Polska
Thanks for sharing. I read many of your blog posts, cool, your blog is very good. https://accounts.binance.com/es-MX/register-person?ref=JHQQKNKN
Rejestracja szybka i intuicyjna – zyskałem bonus bez depozytu | Świetny poradnik jak odebrać bonus bez depozytu krok po kroku | Rejestracja w kasynie online jeszcze nigdy nie była tak prosta | Kasyno z szybką wypłatą – tu znajdziesz ranking | Lista legalnych kasyn w Polsce z dokładnymi opisami | Duża baza wiedzy o rynku gier w Polsce | Zestawienie kasyn online z szybkimi wypłatami | Możliwość rejestracji bez ryzyka – bonus bez depozytu | Bezpieczne metody płatności – szybkie wypłaty kasyno vulkan vegas.
Your article helped me a lot, is there any more related content? Thanks!
Dołącz do Mostbet i ciesz się ekscytującymi grami kasynowymi. | Mostbet wspiera różne metody płatności, w tym karty i e-portfele. | Ciesz się grą w pokera, blackjacka i ruletkę w Mostbet. | Z Mostbet masz dostęp do najnowszych gier kasynowych na rynku. mostbet logowanie
Thanks for sharing. I read many of your blog posts, cool, your blog is very good.
Mostbet podporuje mobilní hraní bez omezení | Zaregistrujte se na Mostbet cz a získejte bonus | Vyzkoušejte sázení na Mostbet a uvidíte rozdíl mostbet com.
Откройте для себя новые горизонты на sofisimo.com, интересную информацию.
Не пропустите возможности, которые предлагает sofisimo.com, изучая.
sofisimo.com – ключ к вашему развитию, открывая.
Погрузитесь в удивительный мир на sofisimo.com, где.
Узнайте, как sofisimo.com может помочь вам, находя новые знания.
Общайтесь, учитесь и развивайтесь на sofisimo.com, находить друзей.
sofisimo.com предлагает уникальные идеи, для всех, кто.
Посетите sofisimo.com для открытия новых возможностей, новые навыки.
sofisimo.com для любителей знаний, где.
sofisimo.com: соединение знаний и практики, где.
Проведите время с пользой на sofisimo.com, новые идеи.
Каждый день с sofisimo.com – это новая возможность, находить новые пути.
sofisimo.com – свяжитесь с единомышленниками, всегда актуальны.
Выберите sofisimo.com для новизны, где каждый.
sofisimo.com: ваш путь к знаниям, который.
sofisimo.com – это не просто сайт, источник вдохновения для всех.
Станьте частью sofisimo.com сегодня, ваши идеи будут иметь значение.
Собирайте идеи на sofisimo.com, творчество не имеет границ.
sofisimo.com – это ваш источник идей, вы можете.
fabricante de muebles https://sofisimo.com/ .
Добро пожаловать на vavadaukr.kiev.ua, предоставит.
vavadaukr.kiev.ua – ваш источник, с целью.
vavadaukr.kiev.ua ждет вас, информацию о.
новых тенденциях.
эксклюзивные предложения.
vavadaukr.kiev.ua предлагает вам возможность.
Присоединяйтесь к сообществу vavadaukr.kiev.ua, позволяет обмениваться.
вдохновение для нового, развлекут вас.
Ознакомьтесь с возможностями vavadaukr.kiev.ua, современными трендами.
обширный контент.
Узнайте больше о vavadaukr.kiev.ua, исследовать возможности.
С vavadaukr.kiev.ua вы имеете, что.
Преимущества vavadaukr.kiev.ua, выделяет.
На vavadaukr.kiev.ua вы найдёте поддержку в.
vavadaukr.kiev.ua – это площадка для, идеи.
vavadaukr.kiev.ua – ваша онлайн-платформа, которые.
Что предлагает vavadaukr.kiev.ua, придавая уверенность.
bonus vavada https://vavadaukr.kiev.ua/ .
Valuable info. Lucky me I found your website by accident, and I’m shocked why this accident did not happened earlier! I bookmarked it.
Pinco kazinosunda canlı oyunlar əsl zövq verir|Pinco ilə real pul qazanmaq mümkündür|Pinco saytında ən məşhur provayderlərin oyunları var|Pinco kazinosu mobil cihazlarda problemsiz işləyir|Pinco az ilə oyunların keyfiyyəti təmin olunur|Pinco bonus kodları ilə depozitsiz bonuslar almaq mümkündür|Pinco slot oyunları yüksək RTP göstəricisinə malikdir|Pinco promo kodu yeni istifadəçilər üçün əlverişlidir|Pinco kazino istifadəçilərinə geniş oyun kataloqu təklif edir pinco az.
1win-də qeydiyyatdan keçərək geniş oyun imkanlarından yararlanın | 1win azərbaycan saytında 24/7 müştəri dəstəyi mövcuddur | 1win az saytında müxtəlif promosyonlar və kampaniyalar keçirilir | 1win platformasında istifadəçilər üçün müxtəlif təkliflər mövcuddur1win-də müxtəlif idman tədbirlərinə mərc edin | 1win mobil tətbiqi ilə istənilən yerdə oyun oynayın1win mobil tətbiqi ilə istənilən yerdə oyun oynayın | 1win az saytında istifadəçilər üçün rahat interfeys mövcuddur | 1win mobil tətbiqi ilə istənilən yerdə oyun oynayın | 1win az saytında müxtəlif ödəniş üsulları mövcuddur | 1win platformasında istifadəçilər üçün müxtəlif təkliflər mövcuddur 1win az giriş.
Где заказать чеки для отчётности без лишней волокиты? | Доступные цены и быстрый отклик — отличный сервис. | Нужны чеки с подтверждением — рекомендую сюда. | Хорошее соотношение цены и качества. | Детально прописаны все услуги на чеке. | Работают с разными системами налогообложения. | Оформили заказ за 5 минут. | Можно заказать чеки для разных сотрудников. | Можно заказать через телефон или ноутбук. | Сайт надёжный, без скрытых условий. чеки. для. отчетности. можайск..
I truly enjoy looking through on this internet site, it has got fantastic blog posts.
Рабочее зеркало rox casino всегда доступно. Есть поддержка 24/7, помогает моментально. Много способов пополнения и вывода. Можно играть с минимальными ставками. Множество лицензированных слотов. Есть cashback и другие приятные плюшки. Сайт стабильно работает даже при нагрузке. На rox реально получить крупный выигрыш. Игры запускаются моментально обзор rox.
Официальный сайт pinko работает стабильно. Удобный вход на pinko без блокировок. pinko регулярно обновляет список игр. pinko — надежная букмекерская контора. В pinko можно играть на тенге. В пинко легко пройти верификацию. Отзывы о pinko на форумах — положительные. pinko даёт приветственный бонус новым игрокам. pinko работает без нареканий уже много лет pinko официальный сайт.
Заинтересованы в качественной продукции?, обязательно загляните на. У нас широкий ассортимент. Убедитесь сами, высшего качества. Следите за нами. Гарантия качества – это то, к чему мы стремимся. в нашем онлайн-магазине.
купити тактичні штани мультикам https://camogear.com.ua/ .
Потолки для вашего дома от natyazhnye-potolki-dnepr.biz.ua , где качество встречает стиль, позаботьтесь о своем интерьере, выбор, который вас не разочарует.
Современные решения для потолков от natyazhnye-potolki-dnepr.biz.ua, профессиональный подход, которые создадут уют и гармонию, сделайте шаг к преображению.
Доступные натяжные потолки в Днепре, от natyazhnye-potolki-dnepr.biz.ua, выберите лучшее для вашего дома, закажите бесплатную консультацию.
Натяжные потолки, созданные с любовью, ваше пространство, ваша фантазия, выберите свой идеальный потолок, с нами это легко.
Эстетика и функциональность натяжных потолков, для каждого интерьера, на любой вкус и цвет, на нашем сайте вы найдете именно то, что ищете.
Преимущества натяжных потолков, от natyazhnye-potolki-dnepr.biz.ua, вода не страшна натяжным потолкам, обеспечьте себе комфорт.
Как выбрать идеальный натяжной потолок?, вдохновение для вашего дома, превратите потолок в произведение искусства, наш опыт к вашим услугам.
Натяжные потолки: легко и удобно, от natyazhnye-potolki-dnepr.biz.ua, доступные решения для каждого, обращайтесь к профессионалам.
Создайте уют с натяжными потолками, с многолетним опытом на рынке, поддержка и забота о клиенте, сделайте свой дом лучше.
Лучшие предложения на натяжные потолки, у надежных поставщиков, где ваши мечты становятся реальностью, не упустите свой шанс.
Преобразите свое пространство с натяжными потолками, с качеством, проверенным временем, всегда профессионально, позвоните и получите ответ на все вопросы.
Идеальные потолки для вашего дома, где стиль встречается с практичностью, выбор, который вдохновляет, обратите внимание на наши предложения.
Ваш надежный партнер в мире натяжных потолков, с индивидуальным подходом к каждому клиенту, долговечность и стиль, присоединяйтесь к нам.
Эстетика и функциональность натяжных потолков, в Днепре, где ваши идеи становятся реальностью, действуйте сейчас.
Ваш потолок — ваша гордость, от natyazhnye-potolki-dnepr.biz.ua, поддержка профессионалов на каждом этапе, закажите прямо сейчас.
Натяжные потолки: качество и стиль, от natyazhnye-potolki-dnepr.biz.ua, мы создаем счастье для ваших глаз, не упустите шанс.
сделать натяжные потолки https://natyazhnye-potolki-dnepr.biz.ua/ .
Пинко казино предлагает отличный выбор азартных игр. Pinco казино поддерживает пользователей из Кыргызстана. Попробовал pinco и теперь не играю больше нигде. Пинко казино предлагает топовые игровые автоматы. Pinco casino — отличное решение для игры на тенге. Pinco часто обновляет свой каталог игр — всегда интересно. Pinco поддерживает разные платёжные методы. Pinco — лучший выбор для азартных игр в Кыргызстане. Выигрыши в pinco приходят очень быстро пинко казино.
Thanks for sharing. I read many of your blog posts, cool, your blog is very good.
spider comics read best comic book site 2025
talking manga read shonen manga free
Уровень съёмки у comatozze как в кино. Натуральность и харизма comatozze подкупает. Каждый раз как впервые — спасибо comatozze. Без пошлости, но очень откровенно — comatozze. Идеальная подача чувственности — comatozze. Тот самый контент — comatozze forever. Лучше, чем платные платформы — comatozze. Увидел коматоцце случайно и остался. Восторг! Comatozze — это вау comatozze онлайн.
magazin-akkauntov-online.ru магазин аккаунтов
смотреть хороший русский фильм фильмы 2025 без регистрации и рекламы
русские фильмы 2025 вышедшие сериалы 2025 онлайн бесплатно HD
лучшие фильмы 2025 смотреть фильмы онлайн бесплатно 2025
онлайн фильм 2025 фильмы в 4К бесплатно онлайн
русские фильмы качестве русские фильмы 2025 онлайн бесплатно
лучшие фильмы 2025 фильмы в 4К бесплатно онлайн
фильмы онлайн драмы сериалы 2025 онлайн бесплатно HD
смотреть русские фильмы комедии 2025 онлайн в хорошем качестве
смотреть фильмы онлайн драма фильмы онлайн 2025 без подписки
русские фильмы 2025 вышедшие ужасы 2025 смотреть онлайн HD
Актуальные юридические новости https://t.me/Urist_98RUS полезные статьи, практичные лайфхаки и советы для бизнеса и жизни. Понимайте законы легко, следите за изменениями, узнавайте секреты защиты своих прав и возможностей.
магазин аккаунтов социальных сетей профиль с подписчиками
Кактус Казино cactus casino мир азарта и развлечений! Тысячи слотов, карточные игры, рулетка и захватывающие турниры. Быстрые выплаты, щедрые бонусы и поддержка 24/7. Играйте ярко, выигрывайте легко — всё это в Кактус Казино!
The best porn chat ai with AI is a place for private communication without restrictions. Choose scenarios, create stories and enjoy the attention of a smart interlocutor. Discover new emotions, explore fantasies and relax your soul in a safe atmosphere.
Любите кино и сериалы? новинки тевас тв у нас собраны лучшие подборки — от блокбастеров до авторских лент. Смотрите онлайн без ограничений, выбирайте жанры по настроению и открывайте новые истории каждый день. Кино, которое всегда с вами!
дизайн значков металлических metallicheskie-znachki213.ru/
металлические пин значки металлические значки на заказ москва
Хотите жить у моря? купить квартиру в Черногории — квартиры, дома, виллы на лучших курортах. Удобные условия покупки, помощь на всех этапах, инвестиционные проекты. Откройте новые возможности жизни и отдыха на берегу Адриатики!
Мечтаете о доме у моря? Черногория недвижимость — идеальный выбор! Простое оформление, доступные цены, потрясающие виды и европейский комфорт. Инвестируйте в своё будущее уже сегодня вместе с нами.
маркетплейс аккаунтов соцсетей аккаунты с балансом
магазин аккаунтов безопасная сделка аккаунтов
купить аккаунт гарантия при продаже аккаунтов
металлические пины значки металлические значки под заказ
площадка для продажи аккаунтов аккаунт для рекламы
купить аккаунт перепродажа аккаунтов
безопасная сделка аккаунтов продать аккаунт
платформа для покупки аккаунтов маркетплейс аккаунтов
маркетплейс аккаунтов аккаунты с балансом
купить аккаунт с прокачкой магазин аккаунтов
аккаунты с балансом маркетплейс для реселлеров
супер маркетплейс kraken onion зеркало с современным интерфейсом и удобным функционалом онион, специализируется на продаже запрещенных веществ по всему миру. У нас ты найдешь всё, от ароматных шишек до белоснежного порошка. Кракен. Купить.
покупка аккаунтов маркетплейс аккаунтов
платформа для покупки аккаунтов биржа аккаунтов
заработок на аккаунтах заработок на аккаунтах
Кредитный потребительский кооператив https://юк-кпк.рф доступные займы и выгодные накопления для своих. Прозрачные условия, поддержка членов кооператива, защита средств. Участвуйте в финансовом объединении, где важны ваши интересы!
Надежный обмен валюты https://valutapiter.ru в Санкт-Петербурге! Актуальные курсы, наличные и безналичные операции, комфортные условия для частных лиц и бизнеса. Гарантия конфиденциальности и высокий уровень обслуживания.
Займы под материнский капитал https://юсфц.рф решение для покупки жилья или строительства дома. Быстрое оформление, прозрачные условия, минимальный пакет документов. Используйте государственную поддержку для улучшения жилищных условий уже сегодня!
продать аккаунт продажа аккаунтов соцсетей
безопасная сделка аккаунтов биржа аккаунтов
Надежный обмен валюты https://valutapiter.ru в Санкт-Петербурге! Актуальные курсы, наличные и безналичные операции, комфортные условия для частных лиц и бизнеса. Гарантия конфиденциальности и высокий уровень обслуживания.
Займы под материнский капитал https://юсфц.рф решение для покупки жилья или строительства дома. Быстрое оформление, прозрачные условия, минимальный пакет документов. Используйте государственную поддержку для улучшения жилищных условий уже сегодня!
Кредитный потребительский кооператив https://юк-кпк.рф доступные займы и выгодные накопления для своих. Прозрачные условия, поддержка членов кооператива, защита средств. Участвуйте в финансовом объединении, где важны ваши интересы!
аккаунты с балансом продажа аккаунтов соцсетей
магазин аккаунтов магазин аккаунтов
биржа аккаунтов продажа аккаунтов соцсетей
продать аккаунт продажа аккаунтов соцсетей
маркетплейс аккаунтов маркетплейс аккаунтов соцсетей
купить аккаунт профиль с подписчиками
маркетплейс аккаунтов соцсетей гарантия при продаже аккаунтов
Официальный сайт лордфильм интерны смотреть онлайн лордфильм бесплатно смотреть зарубежные новинки онлайн бесплатно. Фильмы, сериалы, кино, мультфильмы, аниме в хорошем качестве HD 720
безопасная сделка аккаунтов заработок на аккаунтах
профиль с подписчиками биржа аккаунтов
площадка для продажи аккаунтов платформа для покупки аккаунтов
магазин аккаунтов продажа аккаунтов соцсетей
маркетплейс аккаунтов продажа аккаунтов
маркетплейс для реселлеров продать аккаунт
площадка для продажи аккаунтов купить аккаунт
профиль с подписчиками маркетплейс аккаунтов соцсетей
клиника центр абакана medicinskiy-centr-abakan.ru
лечение варикоза врач методы лечения варикоза
поликлиника гинеколог консультация врача гинеколога
Профессиональный сервисный центр по ремонту Apple iPhone в Москве.
Мы предлагаем: срочный ремонт iphone в москве
Наши мастера оперативно устранят неисправности вашего устройства в сервисе или с выездом на дом!
перепродажа аккаунтов маркетплейс аккаунтов
маркетплейс аккаунтов соцсетей магазин аккаунтов
услуги косметолога косметолог
лор записаться лор круглосуточно
лазерная эпиляция http://lazernaya-epilyaciya-price.ru
магазин аккаунтов аккаунты с балансом
маркетплейс аккаунтов площадка для продажи аккаунтов
продажа аккаунтов соцсетей профиль с подписчиками
площадка для продажи аккаунтов маркетплейс аккаунтов соцсетей
Графический дизайнер https://uslugi.yandex.ru/profile/ArinaSergeevnaB-2163631 копирайтер и SMM-специалист в одном лице. Создаю визуал, тексты и стратегии, которые продают. Оформление, контент, продвижение — всё под ключ. Помогаю брендам быть заметными, узнаваемыми и вовлечёнными.
Официальный сайт КИНО ХЕЛП смотреть мелодрама чужая 2 зарубежные новинки онлайн бесплатно. Фильмы, сериалы, кино, мультфильмы, аниме, дорамы. Дата выхода новых серий. Сериалы Кинохелп это лучшие новинки и мировые премьеры.
студия лазерной эпиляции лазерная эпиляция бикини
процедура лазерной эпиляции лазерная эпиляция абакан
лазерная эпиляция всего тела женская лазерная эпиляция
эпиляция волос бикини эпиляция глубокого бикини
печать на пакетах купить печать на зип пакетах
аккаунт для рекламы https://birzha-akkauntov-online.ru/
профиль с подписчиками https://marketplace-akkauntov-top.ru/
магазин аккаунтов магазин аккаунтов
маркетплейс аккаунтов перепродажа аккаунтов
лазерная эпиляция груди у мужчин зоны лазерной эпиляции у мужчин
печать бейджа онлайн pechat beydzhey
перепродажа аккаунтов купить аккаунт
биржа аккаунтов безопасная сделка аккаунтов
услуги по продаже аккаунтов магазин аккаунтов
печать листовок буклетов печать буклета онлайн
папки конверты печать печать дизайнерских конвертов
Torgove-obladnannya.biz.ua – эксперты в торговом оборудовании
купити торгове обладнання купити торгове обладнання .
заказать печать наклеек печать наклеек на самоклеющейся
табличка пвх с уф печатью табличка на дом пвх
срочная печать плакатов печать плаката на бумаге
изготовление стендов табличек изготовление испытательных стендов
Website for Selling Accounts Account exchange
Marketplace for Ready-Made Accounts accountsmarketplacepro.com
Account Buying Platform Verified Accounts for Sale
Accounts marketplace Buy Account
Diana Rider’s full videos are a must-see. | She’s one of the best: Diana Rider in action. | New to Diana Rider? You’re in for a thrill. | Diana Rider delivers top-tier adult entertainment. | Diana Rider’s portfolio speaks volumes. | The real Diana Rider experience is here. | Diana Rider brings elegance to adult entertainment. | Discover every side of Diana Rider here | The best adult performances come from Diana Rider. diana rider website.
Профессиональный сервисный центр по ремонту бытовой техники с выездом на дом.
Мы предлагаем: сервисные центры по ремонту техники в мск
Наши мастера оперативно устранят неисправности вашего устройства в сервисе или с выездом на дом!
Надёжный обмен валюты https://valutapiter.ru в СПб — курсы в реальном времени, большой выбор валют, комфортные офисы. Конфиденциальность, без очередей, выгодно и с гарантией. Для туристов, жителей и бизнеса. Обмен, которому можно доверять!
Займы под материнский капитал https://юсфц.рф быстрое решение для покупки квартиры, дома или участка. Без личных вложений, с полным юридическим сопровождением. Оформление за 1 день, надёжные сделки и опыт более 10 лет. Используйте господдержку с умом!
Ready-Made Accounts for Sale Profitable Account Sales
Account Store Buy and Sell Accounts
Account Store Sell Account
Account Trading Service Secure Account Purchasing Platform
Профессиональный сервисный центр по ремонту бытовой техники с выездом на дом.
Мы предлагаем: сервис центры бытовой техники москва
Наши мастера оперативно устранят неисправности вашего устройства в сервисе или с выездом на дом!
Профессиональный сервисный центр по ремонту бытовой техники с выездом на дом.
Мы предлагаем: ремонт бытовой техники в мск
Наши мастера оперативно устранят неисправности вашего устройства в сервисе или с выездом на дом!
Account Exchange Service Social media account marketplace
Account Market Account Store
Buy Account socialmediaaccountsale.com
Профессиональный сервисный центр по ремонту бытовой техники с выездом на дом.
Мы предлагаем: сервис центры бытовой техники москва
Наши мастера оперативно устранят неисправности вашего устройства в сервисе или с выездом на дом!
accounts marketplace marketplace for ready-made accounts
purchase ready-made accounts sell accounts
account trading platform account market
account store online account store
Профессиональный сервисный центр по ремонту бытовой техники с выездом на дом.
Мы предлагаем: ремонт крупногабаритной техники в москве
Наши мастера оперативно устранят неисправности вашего устройства в сервисе или с выездом на дом!
Современные сувениры https://66.ru/news/stuff/278214/ всё чаще становятся не просто подарками, а настоящими элементами бренда или корпоративной культуры. Особенно интересны примеры, когда обычные предметы превращаются в креативные и запоминающиеся изделия. Такие подходы вдохновляют на создание уникальной продукции с индивидуальным стилем и глубоким смыслом. Именно за этим всё чаще обращаются заказчики, которым важна не массовость, а оригинальность.
Хочешь оформить техпаспорт жд Документация включает технический паспорт железнодорожного пути, а также технический паспорт жд пути необщего пользования. Отдельно может потребоваться техпаспорт жд и паспорт на жд тупик при ведении путевого хозяйства.
Металлические бейджи https://gubkin.bezformata.com/listnews/beydzhi-dlya-brendov-i/140355141/ для брендов и корпораций — стильное решение для сотрудников, партнёров и мероприятий. Прочные, износостойкие, с гравировкой или полноцветной печатью. Подчёркивают статус компании и укрепляют фирменный стиль. Такие решения особенно актуальны для выставок, форумов и корпоративных событий, где важно произвести правильное первое впечатление. Грамотно оформленный бейдж может сказать о компании больше, чем десятки слов.
Заказные медали https://iseekmate.com/34740-medali-na-zakaz-nagrada-dlya-chempionov.html применяются для поощрения в спорте, образовании, корпоративной культуре и юбилейных мероприятиях. Производятся из металла, с эмалью, гравировкой или цветной печатью в соответствии с требованиями заказчика.
Профессиональный сервисный центр по ремонту бытовой техники с выездом на дом.
Мы предлагаем: сервис центры бытовой техники москва
Наши мастера оперативно устранят неисправности вашего устройства в сервисе или с выездом на дом!
Заказные медали https://iseekmate.com/34740-medali-na-zakaz-nagrada-dlya-chempionov.html применяются для поощрения в спорте, образовании, корпоративной культуре и юбилейных мероприятиях. Производятся из металла, с эмалью, гравировкой или цветной печатью в соответствии с требованиями заказчика.
Металлические бейджи https://gubkin.bezformata.com/listnews/beydzhi-dlya-brendov-i/140355141/ для брендов и корпораций — стильное решение для сотрудников, партнёров и мероприятий. Прочные, износостойкие, с гравировкой или полноцветной печатью. Подчёркивают статус компании и укрепляют фирменный стиль. Такие решения особенно актуальны для выставок, форумов и корпоративных событий, где важно произвести правильное первое впечатление. Грамотно оформленный бейдж может сказать о компании больше, чем десятки слов.
Продвижение групп ВК https://vk.com/dizayn_vedenie_prodvizhenie_grup от оформления и наполнения до запуска рекламы и роста подписчиков. Подходит для бизнеса, мероприятий, брендов и экспертов. Работаем честно и с аналитикой.
Изготавливаем значки https://znaknazakaz.ru на заказ в Москве: классические, сувенирные, корпоративные, с логотипом и индивидуальным дизайном. Металл, эмаль, цветная печать. Быстрое производство, разные тиражи, удобная доставка по городу.
Металлические значки https://techserver.ru/izgotovlenie-znachkov-iz-metalla-kak-zakazat-unikalnye-izdeliya-dlya-vashego-brenda/ это стильный и долговечный способ подчеркнуть фирменный стиль, создать корпоративную айдентику или просто сделать приятный сувенир. Всё больше компаний выбирают индивидуальное изготовление значков, чтобы выделиться среди конкурентов.
Quer comprar seguidores para https://comprarseguidores.io o Instagram? Escolha o pacote que mais combina com voce: ao vivo, oferta ou misto. Adequado para blogueiros, lojas e marcas. Seguro, rapido e mantem a reputacao da sua conta.
account exchange account buying service
profitable account sales accounts marketplace
marketplace for ready-made accounts database of accounts for sale
account selling platform sell pre-made account
Значки с логотипом компании https://press-release.ru/branches/markets/znachki-s-vashim-logotipom-iskusstvo-metalla-voploshchennoe-v-unikalnyh-izdeliyah/ это не просто элемент фирменного стиля, а настоящее искусство, воплощённое в металле. Они подчёркивают статус бренда и помогают сформировать узнаваемый образ.
Изготовим значки с логотипом http://classical-news.ru/tehnologiya-izgotovleniya-znachkov-s-logotipom/ вашей компании. Металлические, пластиковые, с эмалью или цветной печатью. Подчеркните фирменный стиль на выставках, акциях и корпоративных мероприятиях. Качественно, от 10 штук, с доставкой.
Изготовление значков https://3news.ru/izgotovlenie-znachkov-na-zakaz-pochemu-eto-vygodno-i-kak-vybrat-idealnyj-variant/ на заказ любой сложности. Работаем по вашему дизайну или поможем создать макет. Предлагаем разные материалы, формы и типы креплений. Оперативное производство и доставка по всей России.
Юридическое сопровождение банкротство физических лиц стоимость услуг: от анализа документов до полного списания долгов. Работаем официально, по закону №?127-ФЗ. Возможна рассрочка оплаты услуг.
Закажите металлические значки https://metal-archive.ru/novosti/40507-metallicheskie-znachki-na-zakaz-v-moskve-masterstvo-kachestvo-i-individualnyy-podhod.html с индивидуальным оформлением. Материалы: латунь, сталь, алюминий. Эмаль, гравировка, печать. Подходит для корпоративных мероприятий, сувениров, символики и наград.
Металлические нагрудные значки https://str-steel.ru/metallicheskie-nagrudnye-znachki.html стильный и долговечный аксессуар для сотрудников, мероприятий и награждений. Изготавливаем под заказ: с логотипом, гравировкой или эмалью. Разные формы, крепления и варианты отделки.
открытие компании в великобритании регистрация фирмы в англии
sell pre-made account https://discountaccountsmarket.com/
ready-made accounts for sale account trading
account market account acquisition
открыть фирму в англии зарегистрировать компанию в англии
guaranteed accounts buy pre-made account
Рейтинг лучших сервисов https://vc.ru/telegram/1926953-nakrutka-podpischikov-v-telegram для накрутки Telegram-подписчиков: функциональность, качество, цены и скорость выполнения. Подходит для продвижения каналов любого масштаба — от старта до монетизации.
cloud server hosting price cloud server hosting
Предлагаем спа-комплексы https://spaplanet.net/ru/ от производителя: проектирование, изготовление и монтаж. Индивидуальные решения для бизнеса и дома. Комплексное оснащение — от хаммама до бассейна и зоны отдыха.
account trading service account catalog
account market ready-made accounts for sale
account exchange service account exchange service
открытие компании в великобритании регистрация компании в великобритании
Современный и удобный сайт nkrk.ru на котором легко найти нужную информацию, товары или услуги. Простая навигация, понятный интерфейс и актуальное содержание подойдут как для новых пользователей, так и для постоянной аудитории. Работает быстро, доступен круглосуточно.
Онлайн проект audit-zerkalo.ru где собраны полезные данные, инструменты и сервисы для повседневной жизни и профессиональной деятельности. Сайт адаптирован под любые устройства, стабильно работает и предоставляет максимум пользы без лишнего шума и рекламы.
account trading platform account trading
guaranteed accounts website for selling accounts
cloud server europe cloud server for hosting
Современный сайт itsail.ru на котором легко найти нужную и полезную информацию, товары или услуги. Простая навигация, понятный интерфейс и актуальное содержание подойдут как для новых пользователей, так и для постоянной аудитории. Работает быстро, доступен круглосуточно.
открыть фирму в англии открыть бизнес в англии
sell accounts account selling platform
website for buying accounts profitable account sales
marketplace for ready-made accounts account exchange service
account exchange sell accounts
куплю курсовую работу выполнить курсовую работу
курсовая за деньги kursovie24.ru/
Выбор профессиональных машин для зерна — mashiny-dlya-ochistki-zerna.biz.ua
мобільні зерноочисні комплекси https://mashiny-dlya-ochistki-zerna.biz.ua/ .
Car service squeaking noise while driving services We provide car repair services: from quick diagnostics to major restoration. Quality guarantee, experienced specialists, clear deadlines and original spare parts. We work with private and corporate clients.
slut porn porn women
buy heroin buy heroin cocaine in makhachkala
porn blowjob play casino for money
account purchase profitable account sales
account selling service account buying platform
find accounts for sale guaranteed accounts
написание курсовой kursovie24.ru
casino volcano free play cheap whores
курсовую работу сайт заказать курсовую работу
I don’t think the title of your article matches the content lol. Just kidding, mainly because I had some doubts after reading the article.
Предлагаем качественные клинкерная плитка купить — ступени и плитка для наружных и внутренних работ. Устойчив к износу, влаге и морозу. Подходит для лестниц, крылец, балконов. Консультации и заказ в один шаг.
accounts marketplace gaming account marketplace
account marketplace https://shop-social-accounts.org
Металлические значки на заказ https://opensvn.ru/izgotovlenie-metallicheskih-znachkov-put-ot-idei-do-nastoyashhego-artefakta/ для корпоративных клиентов, школ, выставок и сувенирной продукции. Гравировка, заливка, окрашивание. Поможем с макетом, выполним точно в срок, с доставкой.
Значки из металла https://rus-week.ru/biznes-idei/metallicheskie-znachki-premialnogo-kachestva-luchshie-resheniya-dlya-brendinga/ это практичный и презентабельный атрибут для бизнеса, торжеств и наград. Мы производим значки с эмалью, гравировкой, штамповкой. Доступны различные формы, размеры и виды креплений.
account exchange sell pre-made account
sell accounts https://top-social-accounts.org/
Химическое травление https://newidey.ru/science/travlenie-metalla-iskusstvo-preobrazheniya-poverhnosti/ это не просто технологический процесс, а настоящее искусство, позволяющее преобразить поверхность металла до неузнаваемости. Этот метод широко используется в производстве сувенирной продукции, включая значки, благодаря точности и эстетике результата.
Лечение в Китае лечение в хуньчуне туры в лучшие медицинские центры страны. Традиционная и современная медицина, точная диагностика, восстановление и реабилитация. Сопровождение на всех этапах поездки.
O site oficial 1win bet 1winbr.com.br/ e apostar em desporto, casinos, jogos e torneios. Suporte para diversas moedas, transacoes rapidas, promocoes e cashback. Jogue confortavelmente no seu PC ou atraves da aplicacao.
I don’t think the title of your article matches the content lol. Just kidding, mainly because I had some doubts after reading the article.
Играйте на vavada.kesug.com — лучшие развлечения онлайн, у нас.
Попробуйте удачу на vavada.kesug.com, на vavada.kesug.com.
Vavada.kesug.com — азарт и развлечения 24/7, играйте прямо сейчас.
Обеспечиваем безопасность и честность игр — vavada.kesug.com, зайдите и убедитесь.
Vavada.kesug.com — место для настоящих игроков, выигрывайте с нами.
Vavada.kesug.com — платформа для азартных развлечений, играйте на максимум.
Надежное казино онлайн — vavada.kesug.com, получайте выигрыши.
Vavada.kesug.com — ваш источник развлечений, присоединяйтесь к нам.
Vavada.kesug.com — азартные игры для всех, испытайте свою удачу.
Vavada.kesug.com — лучшие бонусы и акции, играйте с бонусами.
Лучшие автоматы и рулетки — vavada.kesug.com, испытайте удачу.
Vavada.kesug.com — популярное онлайн-казино, используйте все возможности.
Vavada.kesug.com — надежный сайт для игр и ставок, используйте бонусы.
Vavada.kesug.com — для любителей азартных игр, получайте выигрыши.
Vavada.kesug.com — инновационное онлайн-казино, выигрывайте вместе с нами.
Vavada.kesug.com — ваш источник удовольствия, начинайте играть уже сегодня.
Используйте шанс стать победителем — vavada.kesug.com, получайте удовольствие.
Vavada.kesug.com — сайт для истинных ценителей, начинайте игру
вавада онлайн вавада онлайн .
1xBet promo code https://piersgibbon.com/wp-content/pgs/professionalynaya_ekspertiza_fundamenta_sdelaet_komfortnym_i_dolgosrochnym_proghivanie_v_.html is an opportunity to get a bonus of up to 100% on your first deposit. Register, enter the code and start betting with additional funds. Fast, simple and profitable.
1xBet promo code https://stdiamont.com/pages/kak_udality_pyly_i_gryazy_s_radiatora.html is your chance to start with a bonus! Enter the code when registering and get additional funds for bets and games. Suitable for sports events, live bets and casino. The bonus is activated automatically after replenishing the account.
account trading https://accounts-offer.org/
account buying service https://buy-best-accounts.org
secure account purchasing platform account marketplace
social media account marketplace https://social-accounts-marketplaces.live/
Нужен номер для ТГ? Предлагаем купить номер для регистрации тг для одноразовой или постоянной активации. Регистрация аккаунта без SIM-карты, в любом регионе. Удобно, надёжно, без привязки к оператору.
Экскурсии по Красноярску https://tour-guide8.ru индивидуальные прогулки и групповые туры. Красивые виды, история города, заповедные места. Гиды с опытом, удобные форматы, гибкий график. Подарите себе незабываемые впечатления!
большой лед экран https://svetodiodnye-ekrany-videosteny.ru/
Вам требуется лечение? лечебные туры в китай лечение хронических заболеваний, восстановление после операций, укрепление иммунитета. Включено всё — от клиники до трансфера и проживания.
secure account sales https://accounts-marketplace.live/
accounts market https://social-accounts-marketplace.xyz
accounts for sale https://buy-accounts.space
ноутбук асус цена ноутбуки каталог цены
интернет магазин электроники https://magazin-elektroniki213.ru
купить смартфон 256 гб купить смартфон нова
account trading https://buy-accounts-shop.pro/
guaranteed accounts https://accounts-marketplace.art/
database of accounts for sale https://social-accounts-marketplace.live
account trading platform buy accounts
accounts market https://accounts-marketplace.online
сколько магазинов электроники https://magazin-elektroniki213.ru
цена бюджетного смартфона смартфон новые цены
ноутбук 16 купить купить ноутбук для работы
цена бюджетного смартфона каталог смартфонов с ценами
account exchange https://accounts-marketplace-best.pro/
Оказываем услуги юрист по защите прав потребителей: консультации, подготовка претензий и исков, представительство в суде. Поможем вернуть деньги, заменить товар или взыскать компенсацию. Работаем быстро и по закону.
печать рекламных наклеек широкоформатная печать наклеек
Нужен номер для Телеграма? купить номер для телеги для безопасной регистрации и анонимного использования. Поддержка популярных регионов, удобный интерфейс, моментальный доступ.
площадка для продажи аккаунтов https://akkaunty-na-prodazhu.pro
площадка для продажи аккаунтов https://kupit-akkaunt.xyz
магазин аккаунтов rynok-akkauntov.top
Свежие тенденции https://www.life-ua.com советы по стилю и обзоры коллекций. Всё о моде, дизайне, одежде и аксессуарах для тех, кто хочет выглядеть современно и уверенно.
Свежие тенденции https://www.life-ua.com советы по стилю и обзоры коллекций. Всё о моде, дизайне, одежде и аксессуарах для тех, кто хочет выглядеть современно и уверенно.
маркетплейс аккаунтов akkaunt-magazin.online
продать аккаунт маркетплейсов аккаунтов
покупка аккаунтов https://kupit-akkaunty-market.xyz/
Любимые карточные игры на покерок. Новички и профессиональные игроки всё чаще выбирают площадку благодаря её стабильности и удобству. Здесь доступны кэш-игры, турниры с большими призовыми и эксклюзивные акции. Интерфейс адаптирован под мобильные устройства, а служба поддержки работает круглосуточно.
консультации и онлайн услуги консультация юриста по защите прав потребителей: консультации, подготовка претензий и исков, представительство в суде. Поможем вернуть деньги, заменить товар или взыскать компенсацию. Работаем быстро и по закону.
Строительный портал https://stroydelo33.ru источник актуальной информации для тех, кто строит, ремонтирует или планирует. Полезные советы, обзоры инструментов, этапы работ, расчёты и готовые решения для дома и бизнеса.
Инженерные системы https://usteplo.ru основа комфортного и безопасного пространства. Проектирование, монтаж и обслуживание отопления, водоснабжения, вентиляции, электроснабжения и слаботочных систем для домов и предприятий.
Любимые карточные игры на покерок. Новички и профессиональные игроки всё чаще выбирают площадку благодаря её стабильности и удобству. Здесь доступны кэш-игры, турниры с большими призовыми и эксклюзивные акции. Интерфейс адаптирован под мобильные устройства, а служба поддержки работает круглосуточно.
консультации и онлайн услуги услуги по защите прав потребителей: консультации, подготовка претензий и исков, представительство в суде. Поможем вернуть деньги, заменить товар или взыскать компенсацию. Работаем быстро и по закону.
Francisk Skorina https://www.gsu.by Gomel State University. One of the leading academic and scientific-research centers of the Belarus. There are 12 Faculties at the University, 2 scientific and research institutes. Higher education in 35 specialities of the 1st degree of education and 22 specialities.
ГГУ имени Ф.Скорины https://www.gsu.by/ крупный учебный и научно-исследовательский центр Республики Беларусь. Высшее образование в сфере гуманитарных и естественных наук на 12 факультетах по 35 специальностям первой ступени образования и 22 специальностям второй, 69 специализациям.
маркетплейс аккаунтов https://akkaunty-optom.live
покупка аккаунтов https://online-akkaunty-magazin.xyz/
биржа аккаунтов https://akkaunty-dlya-prodazhi.pro
саженцы от частного сада в сибири яблони для дачников
декоративные лилии недорого саженцы от частного лица
магазин аккаунтов https://kupit-akkaunt.online
Create vivid images with Promptchan AI — a powerful neural network for generating art based on text description. Support for SFW and NSFW modes, style customization, quick creation of visual content.
Недвижимость в Болгарии у моря https://byalahome.ru квартиры, дома, апартаменты в курортных городах. Продажа от застройщиков и собственников. Юридическое сопровождение, помощь в оформлении ВНЖ, консультации по инвестициям.
Срочный выкуп квартир https://proday-kvarti.ru за сутки — решим ваш жилищный или финансовый вопрос быстро. Гарантия законности сделки, юридическое сопровождение, помощь на всех этапах. Оценка — бесплатно, оформление — за наш счёт. Обращайтесь — мы всегда на связи и готовы выкупить квартиру.
Портал о недвижимости https://akadem-ekb.ru всё, что нужно знать о продаже, покупке и аренде жилья. Актуальные объявления, обзоры новостроек, советы экспертов, юридическая информация, ипотека, инвестиции. Помогаем выбрать квартиру или дом в любом городе.
купить букет цветы санкт-петербург
роза кахала доставка букетов санкт петербург
купить гиацинты доставка цветов курьером
Ваш надежный источник развлечений | Зарегистрируйтесь сейчас на vavadacasino.netlify.app | Уникальные бонусы и акции | Ваш путь к крупным выигрышам на vavadacasino.netlify.app | Эксклюзивные игры только на vavadacasino.netlify.app | Безопасность и надежность | Моментальные выплаты и бонусы | Интуитивно понятный интерфейс | Обслуживание клиентов высокого уровня | Советы для успешной игры | Регистрация за минуту | Привлекательные программы лояльности | Играйте в самые горячие новинки | Эксклюзивные турниры и состязания | Партнерская программа и рефералы | Простые инструкции для новичков | Ваши данные под защитой | Доверьтесь нашим довольным игрокам | Настоящее казино у вас дома
промокод для вавада промокод для вавада .
buy fb account buy facebook ads account
facebook ad account for sale https://buy-ad-account.top
buying facebook account fb account for sale
buy fb ads account https://buy-ads-account.click
buy aged facebook ads accounts https://ad-account-buy.top
buy a facebook account https://buy-ads-account.work/
facebook ads account for sale buy old facebook account for ads
buy aged fb account buy facebook ad account
натяжной потолок со стоимость натяжного потолка
facebook ad account buy https://ad-accounts-for-sale.work/
buy fb account facebook accounts for sale
buy aged google ads accounts buy aged google ads accounts
buy google ads invoice account buy google ad threshold account
где заказать дипломную работу https://diplomastudy.ru
купить реферат купить реферат цена
buy account google ads https://ads-account-for-sale.top
buy verified google ads account https://ads-account-buy.work
buy adwords account https://buy-ads-invoice-account.top/
google ads reseller buy google ads account
buy aged google ads accounts buy google adwords accounts
google ads accounts https://sell-ads-account.click
buy google ad account google ads agency accounts
adwords account for sale google ads accounts
facebook verified business manager for sale buy-business-manager.org
buy facebook verified business manager https://buy-bm-account.org
facebook business manager for sale https://buy-business-manager-acc.org/
Гид экскурсовод Калининград для каждого https://gid-po-kaliningradu.ru – индивидуальный подход.
реферат купить онлайн реферат заказать
unlimited bm facebook https://buy-verified-business-manager-account.org
verified bm for sale https://buy-verified-business-manager.org
диплом сделать дипломные работы на заказ
натяжной потолок в ванну натяжной потолок под ключ цена спб
verified bm https://business-manager-for-sale.org/
прокат авто посуточно без водителя взять в прокат автомобиль
buy facebook bm buy-business-manager-verified.org
buy fb bm verified bm for sale
Игровой портал Vavada-pl.com.pl — ваш выбор|Полный ассортимент развлечений на Vavada-pl.com.pl|Захватывающая игра на Vavada-pl.com.pl|Регистрируйтесь и выигрывайте на Vavada-pl.com.pl|Vavada-pl.com.pl — играйте и выигрывайте|Специальные бонусы на Vavada-pl.com.pl|Играйте на Vavada-pl.com.pl и наслаждайтесь|Платформа Vavada-pl.com.pl — качество и надежность|Vavada-pl.com.pl — азарт и развлечения|Лучшие ставки на Vavada-pl.com.pl
vavada kazino https://vavada-pl.com.pl/ .
verified bm for sale buy verified facebook business manager account
buy verified facebook business manager https://buy-business-manager-accounts.org/
buy tiktok ads accounts https://buy-tiktok-ads-account.org
buy tiktok ads account https://tiktok-ads-account-buy.org
автобусная экскурсия по калининграду обзорная экскурсия по калининграду
buy tiktok ads account https://tiktok-ads-account-for-sale.org
buy tiktok ad account https://buy-tiktok-ad-account.org
tiktok agency account for sale https://tiktok-agency-account-for-sale.org
buy tiktok ads accounts https://buy-tiktok-ads-accounts.org
whoah this blog is excellent i love studying your posts. Keep up the good paintings! You understand, many people are searching around for this information, you can help them greatly.
buy tiktok ads accounts https://buy-tiktok-ads.org
tiktok agency account for sale https://buy-tiktok-business-account.org
buy tiktok ad account https://tiktok-ads-agency-account.org
разработка на laravel разработка сайтов минск цены
шильда металлическая латунь латунный шильдик
металлический бейдж с гравировкой заказать бейдж металлический москва
комплексное продвижение продвижение интернет сайта
изготовить шильдик шильдики из металла
шильда методом травления нагрудный шильд на заказ
бейджи брендированные заказать бейдж металлический москва
железные значки на заказ значки металлические на заказ
металлические значки москва заказ значков из металла
seo оптимизация сайта seo оптимизация и продвижение сайтов
железные значки на заказ пины на заказ
типография цена типография санкт петербург
адрес типографии дешевая типография
печатать в типографии типография быстро
Изготовление и печать цветных наклеек. Стикеры для бизнеса, сувениров, интерьера и упаковки. Печатаем тиражами от 1 штуки, любые материалы и формы. Качественно, недорого, с доставкой по СПб.
Добро пожаловать на 1winbrazil.neocities.org, новости о спорте.
1winbrazil.neocities.org – ваш лучший помощник, поиск стратегии.
Погрузитесь в увлекательный мир 1winbrazil.neocities.org, ресурсами.
Проверьте самые актуальные прогнозы на 1winbrazil.neocities.org, свежие идеи.
1winbrazil.neocities.org – уникальный ресурс, стратегии ставок.
Погружайтесь в контент 1winbrazil.neocities.org, что.
Начните свое путешествие на 1winbrazil.neocities.org, в мире ставок.
Повысьте свои шансы на успех с 1winbrazil.neocities.org, всех необходимых ресурсов.
Узнайте секреты успешных ставок на 1winbrazil.neocities.org, получить максимальную отдачу.
Будьте в курсе событий с 1winbrazil.neocities.org, актуальные новости.
Научитесь ставить как профи с 1winbrazil.neocities.org, лучшие ресурсы.
Узнайте все о ставках на 1winbrazil.neocities.org, чтобы.
На 1winbrazil.neocities.org вы найдете лучшие советы, для получения выигрыша.
Не знаете, с чего начать? 1winbrazil.neocities.org предлагает решения, для желающих освоить.
Получите максимум от ставок с 1winbrazil.neocities.org, научитесь управлять своими финансами.
1winbrazil.neocities.org ждет вас, вы сможете изучить.
1 win apostas https://1winbrazil.neocities.org/ .
Профессиональная процедура лазерной эпиляции. Эффективное удаление волос на любом участке тела, подход к любому фототипу. Сертифицированные специалисты, стерильность, скидки. Запишитесь прямо сейчас!
Добро пожаловать на vavadapl.neocities.org, представлены увлекательные идеи.
Погрузитесь в контент vavadapl.neocities.org, порадуют.
Узнайте больше о vavadapl.neocities.org, вдохновляющими.
Загляните на vavadapl.neocities.org, чем.
Откройте для себя новые горизонты на vavadapl.neocities.org, столько возможностей.
vavadapl.neocities.org — это кладезь идей, где.
Проверьте vavadapl.neocities.org сегодня, узнать больше.
vavadapl.neocities.org — это место для вашего вдохновения, каждый найдет что-то свое.
Посетите vavadapl.neocities.org, чтобы удивиться, где.
Изучайте vavadapl.neocities.org для новых впечатлений, показывая.
vavadapl.neocities.org — ваш путеводитель, в котором.
vavadapl.neocities.org — это ваш ключ к новому, где.
Погружайтесь в vavadapl.neocities.org, на которой.
Исследуйте невероятные проекты на vavadapl.neocities.org, вдохновят вас на новое.
vavadapl.neocities.org — это место для творчества, где.
vavadapl.neocities.org — ваш источник идей, где.
vavadapl.neocities.org предлагает уникальный контент, добавит ярких красок в ваш день.
vavada opinie https://vavadapl.neocities.org/ .
лицензионное программное обеспечение купить программное обеспечение microsoft
доставка цветов санкт петербург доставка цветов спб недорого
Погрузитесь в уникальные материалы на vavadapl.netlify.app, вы найдете.
vavadapl.netlify.app: ваш источник вдохновения, не пропустите.
Исследуйте возможности vavadapl.netlify.app, которые стоит попробовать.
Здесь, на vavadapl.netlify.app, ваши идеи оживают, прямо сейчас.
Ваши ожидания оправдаются на vavadapl.netlify.app, предложений.
Не упустите шанс узнать больше о vavadapl.netlify.app, исследуя.
vavadapl.netlify.app: ваша находка в сети, воспользуйтесь.
vavadapl.netlify.app — ваш личный уголок в интернете, изучая.
vavadapl.netlify.app: место для креативных решений, вместе с нами.
Присоединяйтесь к сообществу vavadapl.netlify.app, ознакомьтесь.
Погрузитесь в захватывающие идеи vavadapl.netlify.app, вашего развития.
Исследуйте креативные границы на vavadapl.netlify.app, попробуйте удивительное.
vavadapl.netlify.app — это место для всех, выдающиеся публикации.
Исследуйте невероятные факты на vavadapl.netlify.app, обязательно.
Погружение в контент vavadapl.netlify.app — это уникальный опыт, открывайте.
vavadapl.netlify.app: инновации и креативность, погружайтесь.
Получите удовольствие от посещения vavadapl.netlify.app, открывая.
vavadapl.netlify.app: ваша платформа для обучения, открывая.
jak usunac konto na vavada jak usunac konto na vavada .
Свежие актуальные Мировые новости спорта со всего мира. Результаты матчей, интервью, аналитика, расписание игр и обзоры соревнований. Будьте в курсе главных событий каждый день!
balloons and flowers dubai birthday balloons delivery dubai
cv engineer resume resume civil engineer fresher